

Showing posts with label M31. Show all posts
Showing posts with label M31. Show all posts
Thursday, August 12, 2010
Wednesday, August 11, 2010
M31 11th Aug 2010
You'll never believe it! it was clear last night. First time we've had a solidly clear night for ages. So I thought I'd waste my time imaging M31 yet again. Although Actually this is the first time with my new setup, ie. camera/tak config.
Here is 115 one minute subs, with darks, flats and bias.
Processed in Deep Sky Stacker and CS4 with the help of Noels tools and some very useful actions that I found on Cloudy Nights over the years.
BTW I saw about half a dozen Perseids meteors as well

Here is 115 one minute subs, with darks, flats and bias.
Processed in Deep Sky Stacker and CS4 with the help of Noels tools and some very useful actions that I found on Cloudy Nights over the years.
BTW I saw about half a dozen Perseids meteors as well


Tuesday, August 10, 2010
M31 starless from 2009
Been messing with M31 again and produced another version minus most of the stars in our galaxy.


Monday, July 19, 2010
M31 tweaked.
As there haven't been any clear nights for ages, I decided to tweak my M31 that I re-processed the other day.


Wednesday, July 14, 2010
M31 rising again.
Here's my M31 from last year, re-processed yet again. Hope to improve this year ;-)
Now that I have the camera config sorted with the SKY-90.

Now that I have the camera config sorted with the SKY-90.

Wednesday, March 10, 2010
M31 re-processed from October.
Learning to process all the time, some people say that it's 25% imaging and 75% processing with deepsky stuff, I think that's about right. I'm learning how to do things different all the time!
This has 3Hours and 40mins worth of data.
Takahashi Sky-90, Takahashi F/4.5 Reducer, Canon EOS 50D, DSS, CS4, Noels tools and a Star removing action.

Here's the comparison.
And below is a "Starless" version (minus the stars from our own galaxy).

This has 3Hours and 40mins worth of data.
Takahashi Sky-90, Takahashi F/4.5 Reducer, Canon EOS 50D, DSS, CS4, Noels tools and a Star removing action.

Here's the comparison.
And below is a "Starless" version (minus the stars from our own galaxy).

Wednesday, February 17, 2010
Our Neighbor Andromeda from WISE... and me.
This is nice, from the WISE telescope. With the same area imaged by me last year.


NASA's Wide-field Infrared Survey Explorer, or WISE.


NASA's Wide-field Infrared Survey Explorer, or WISE.
Sunday, October 18, 2009

Tuesday, October 13, 2009
M31 with more data.
I was out again last night to capture some more data for M31. This image a 2hour 34min in total, taken from 30sec subs. Darks, flats and bias applied.
Still not sure about the colour, looks a bit monochromatic green to me.

Since my scope was reaching the edge of the shed imaging M31... and everything comes to an abrupt end. I thought I'd finish off the night with an easy target.
The double cluster in Perseus, NGC 869 and NGC 884.

There's so many stars in this region :-o
Still not sure about the colour, looks a bit monochromatic green to me.

Since my scope was reaching the edge of the shed imaging M31... and everything comes to an abrupt end. I thought I'd finish off the night with an easy target.
The double cluster in Perseus, NGC 869 and NGC 884.

There's so many stars in this region :-o
Monday, October 12, 2009
M31 12th Oct 2009
Still plugging away at M31, trying different techniques. Here's 1hr 27mins from last night.

Aw gawd! I'm off again, re-processing already... I find M31 so tricky to process. My sky pollution is quite high and it obscures the nebulosity of the galaxy, so you have to make nasty compromises with the levels etc. in PS.


Aw gawd! I'm off again, re-processing already... I find M31 so tricky to process. My sky pollution is quite high and it obscures the nebulosity of the galaxy, so you have to make nasty compromises with the levels etc. in PS.

Sunday, September 27, 2009
M31 & M45 27th Sept 2009
Managed to get out last night with my Takahashi, first time for ages :-)
Thought I'd try some easy targets M31 & M45, although not so easy to process.
I imaged M31 for 2 hours and M45 for 1 before calling it a day(night) at 3:00 in the morning... zzzzz.
When I finished, my C9.25 (which was piggy backing the Tak) corrector plate was covered in ice!
I realised that after moving to M45, that the scope wasn't quite in sharp focus, so some of these stars are a bit bloated.

Larger wide field view... processed another way.


Thought I'd try some easy targets M31 & M45, although not so easy to process.
I imaged M31 for 2 hours and M45 for 1 before calling it a day(night) at 3:00 in the morning... zzzzz.
When I finished, my C9.25 (which was piggy backing the Tak) corrector plate was covered in ice!
I realised that after moving to M45, that the scope wasn't quite in sharp focus, so some of these stars are a bit bloated.

Larger wide field view... processed another way.


Tuesday, July 28, 2009
Imaging M31 last night.
Hmmm... I don't think 18 minutes worth of 30 second subs really cuts it. Clouds stopped play :-(
Still the set-up worked. The Tak is quite 'bouncy' sitting on top of the C9.25. But the vibrations die down quickly enough.
I've ordered a 7lb Losmandy weight as well, which I'm assured will fit onto the CGE counterweight bar. Two 25lb weights work, but are a tad heavy for this combination.


Still the set-up worked. The Tak is quite 'bouncy' sitting on top of the C9.25. But the vibrations die down quickly enough.
I've ordered a 7lb Losmandy weight as well, which I'm assured will fit onto the CGE counterweight bar. Two 25lb weights work, but are a tad heavy for this combination.


Monday, February 02, 2009
M31 from 2008
Since the weather is rubbish at present, it's time to re-process my M31 again!
I think I've cracked it, this is my best process to date.

Warning largish files.
Below is a version using Photoshop CS4 Distort & Lens Correction as a pseudo field flattener.

I think I've cracked it, this is my best process to date.

Warning largish files.
Below is a version using Photoshop CS4 Distort & Lens Correction as a pseudo field flattener.

Wednesday, December 24, 2008
M31 - re-processed again
I've been looking at other peoples M31's and have re-processed mine again... I'm trying to get a more natural look.


Thursday, December 04, 2008
Andromeda Galaxy, circa 1959
Just found this 1959 image of M31 that I talked about earlier in my blog on the Palomar Skies blog.
Photographed through one of my other favourite telescopes, the 48-inch Schmidt telescope at Palomar (now known as the Samuel Oschin Telescope).
Here's an up to date (interactive) image taken with the same scope.

Photographed through one of my other favourite telescopes, the 48-inch Schmidt telescope at Palomar (now known as the Samuel Oschin Telescope).
Here's an up to date (interactive) image taken with the same scope.

Wednesday, November 05, 2008
M31 ...and others - processed with Noel's actions.
Been playing ...I bought a copy of Noel Carboni's Astronomy Tools today for Photoshop.
I'm still getting my head around them, but they're easy to use, and I can highly recommend them.

The actions used above are; Light pollution removal, Make stars smaller, Increase star color, Soft color gradient removal and a small amount of Star diffraction spikes (not really visible in this image).
Warning: Be prepared for loads of pretty pictures with star spikes all over them ;-)
Like these... hehe.


I'm still getting my head around them, but they're easy to use, and I can highly recommend them.

The actions used above are; Light pollution removal, Make stars smaller, Increase star color, Soft color gradient removal and a small amount of Star diffraction spikes (not really visible in this image).
Warning: Be prepared for loads of pretty pictures with star spikes all over them ;-)
Like these... hehe.


Wednesday, October 29, 2008
M31 with sharpening techniques.
Boy! you just can't leave it alone.
Using high Pass filtering technique from here.

M31 - 273 frames, 5 hours and 24 minutes, ISO 800.
Using high Pass filtering technique from here.

M31 - 273 frames, 5 hours and 24 minutes, ISO 800.
Thursday, October 02, 2008
M31 with 4 nights data - 3 hours, 27mins, 207 subs

I've had this book for years, and I've always wanted to get a shot like the front cover... getting close. I know it's not a very good scan though and it doesn't do the picture any justice.

Monday, September 29, 2008
Yet another version of M31
I'm trying various techniques of sharpening without blowing the stars out too much, and also subtle colouring/noise reduction.
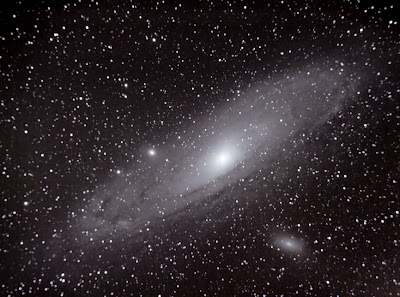
Here's the method in Photoshop:-
1) Duplicate the layer
2) Select - Colour Range - Click on a bright star
The higher the slider, the more stars, usually set around 20
3) Expand - Select - Modify - Expand, say 4 pixels
4) Feather - Select - Modify - Feather, 2/3 expansion value - 3 pixels
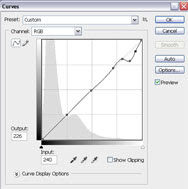
5) Curves - as in the chart below:-
6) Saturate - Adjust Hue/Sat to around 60%
7) Filter - Other, min - radius 1
8) Edit - Fade min 50%
9) Deselect... all done.
I also used this method in processing M13, it can produce nice globular stars.

Here's the method in Photoshop:-
1) Duplicate the layer
2) Select - Colour Range - Click on a bright star
The higher the slider, the more stars, usually set around 20
3) Expand - Select - Modify - Expand, say 4 pixels
4) Feather - Select - Modify - Feather, 2/3 expansion value - 3 pixels
5) Curves - as in the chart below:-

6) Saturate - Adjust Hue/Sat to around 60%
7) Filter - Other, min - radius 1
8) Edit - Fade min 50%
9) Deselect... all done.
I also used this method in processing M13, it can produce nice globular stars.
Sunday, September 28, 2008

Subscribe to:
Posts (Atom)


