Thursday, July 31, 2008
Sunday, July 27, 2008
The Moon 27th July 2008 - 04:48 BST
Jumped out of bed this morning at 4:30am to see if the Moon was visible... it was, so I dashed down to setup and take some hi-res Moon images. But the seeing wasn't that good. So I took a mosaic with the DMK camera and a few colour shots with the Canon 400D. I've merged them into this composite using Photoshop:-
Saturday, July 26, 2008
Midnight Sun on Mars
This panorama mosaic of images was taken by the Surface Stereo Imager on board NASA's Phoenix Mars Lander. This mosaic documents the midnight sun during several days of the mission.
Credit
Credit
Thursday, July 24, 2008
Tuesday, July 22, 2008
Jupiter & moons
Wow it's clear!, well a bit.
Jupiter was very low on the horizon, but at prime focus I was able to image it and get some sort of result. Like looking through jelly. The moons looked good though.
I also spent the rest of the night imaging M57 with a 2x barlow, but they didn't turn out too well. I think this was down to the transparency, or lack of it! ;-(
Friday, July 18, 2008
Japan's JAXA/SELENE satellite Tycho fly-by.
Thursday, July 17, 2008
Wet Environments on Ancient Mars.
A colour-enhanced image of the delta in Jezero Crater, which once held a lake. Ancient rivers ferried clay-like minerals (shown in green) into the lake, forming the delta. Clays tend to trap and preserve organic matter, making the delta a good place to look for signs of ancient life.
Credit text: NASA
Image credit: NASA/JPL/JHUAPL/MSSS/Brown University.
Credit text: NASA
Image credit: NASA/JPL/JHUAPL/MSSS/Brown University.
Wednesday, July 16, 2008
The Hale Telescope.
The Hale Telescope... I don't have any excuse for showing this image... apart from the fact that it's one of my favourite telescopes, and it's still cloudy out there ;-)
Credit: Palomar Skies Blog
Saturday, July 12, 2008
Wednesday, July 09, 2008
Tuesday, July 08, 2008
M57 taken through guider scope.
Here's an interesting one. It's not supposed to be clear tonight, but it is so I thought I'd practice with guidescope setups and alike. This time I used the C9.25 as the guidescope and my guidescope lens as the capturing device. Here is 7 x 65 second frames from the DMK camera trained on M57. Processed in Registax, no flats, darks or bias.
Wide enough field for ya?
Time to batten down the hatches... we're supposed to be getting 40mm of rain tonight :-/
Happy birthday Gemma.
Wide enough field for ya?
Time to batten down the hatches... we're supposed to be getting 40mm of rain tonight :-/
Happy birthday Gemma.
Saturday, July 05, 2008
M31... work in progress
... I need more subs ;-)
Had a quick gander at M31 before packing up on the 4th. This is 11 x 1600ISO frames at 2 minutes each.
The galaxy was very low in the sky, so the FWHM value was quite high.
Had a quick gander at M31 before packing up on the 4th. This is 11 x 1600ISO frames at 2 minutes each.
The galaxy was very low in the sky, so the FWHM value was quite high.
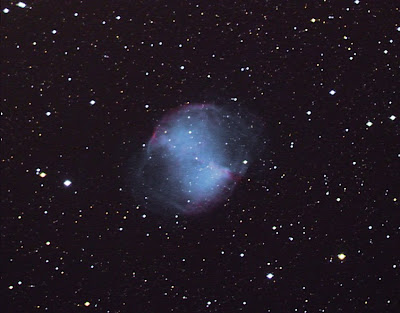
Dumbbell 4th July 2007
Here's another M27 taken on 4th July, (Happy Birthday Leanne).
This is a DSS combination of the previous set of images taken on the 01/07/08 and a set of 28 x 2minute 1600ISO images taken on the 4th. I polar aligned the scope before taking the images, and therefore I didn't use DEC control in PHD. But there was a very small amount of trailing that I could detect, which had to be removed in PS using layering. Because of this the results are not quite as good as I hoped (the stars look like squashed eggs).
Still you live and learn.
The two set of images were quite a bit out of registration, but DSS matched them up perfectly.
Removing star trails:-
Using PS in layers duplicate the image (called a background copy), next change the background copies blending mode to darken,
with background copy highlighted, select the offset tool in filters
Filters>Other>Offset
(zoom in 500% on the image "Ctrl +") and adjust the horizontal/vertical pixels
(undefined areas set to wrap around).
For the full size picture I used Horizontal of "1" and Vertical of "2"...this will vary depending on the size of the trails and what direction they are heading....i.e. up and down...on a 45....sideways.... etc. ....play with the two settings until the trails are diminished or eliminated....you can use negative numbers.
Once you have the star shape where you want it, zoom back out, then flatten the image and save.
If the filter takes it a tad too far, go to the ..... Edit>Fade filter function and this will decrease the amount. (this must be done before you flattern)....play with it a couple of times.
Credit FWHM IMAGING FORUMS
Wednesday, July 02, 2008
Opportunity at Cape Verde (simulated)
Tuesday, July 01, 2008
Dumbbell capturing.
Here's a screen dump from one of my computer screens (running dual monitors you know, it's the only way to go with all these programs running at once).
This shows the PHD guiding window and graph, on the right is the DSLR shutter program.
The HC Buttons are a handy little scope controller that comes with PHD.
Question: Why that star on the left?
Answer: That's what you're supposed to do, pick a star off centre that isn't too bright. ;-)
This shows the PHD guiding window and graph, on the right is the DSLR shutter program.
The HC Buttons are a handy little scope controller that comes with PHD.
Question: Why that star on the left?
Answer: That's what you're supposed to do, pick a star off centre that isn't too bright. ;-)
Subscribe to:
Posts (Atom)